🚀 Getting started#
Note
This section introduces the framework, its core concepts, and the main components of its workflow. It provides a starting point for understanding the framework and prepares you for the complete end-to-end Tutorial. For advanced usage, consult the 📖 API Reference.
Introduction#
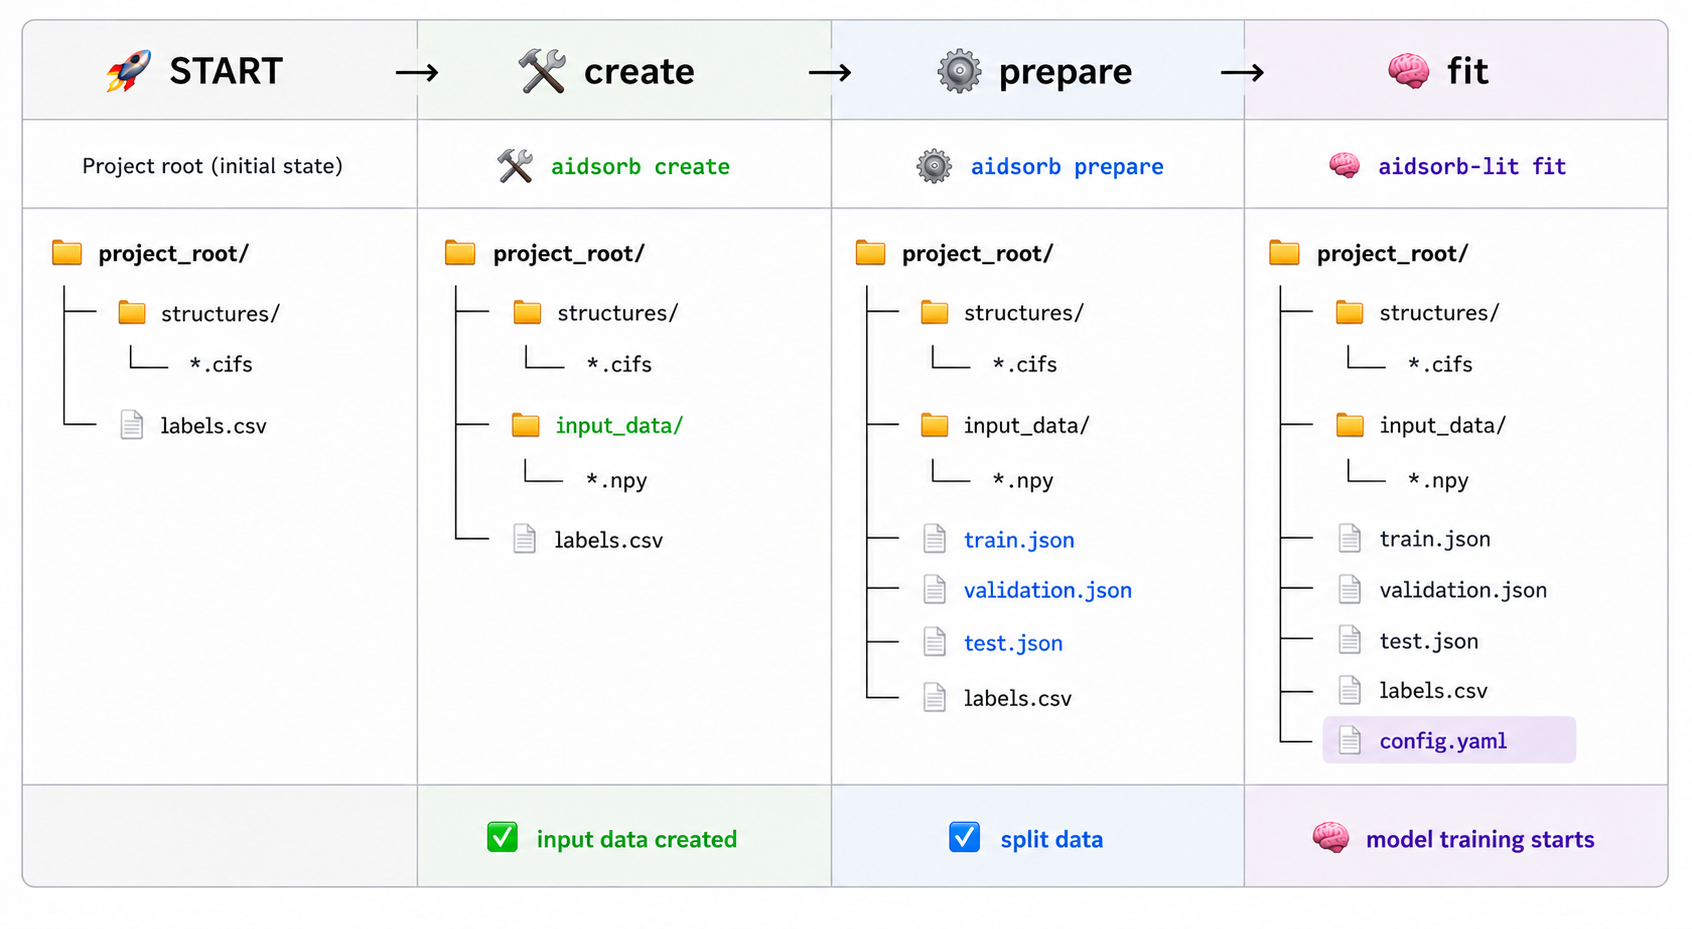
At its core, AIdsorb automates the end-to-end workflow of training deep learning models for porous materials.
The process starts from a directory of molecular structures together with a
labels.csv file containing the target properties. The structures are first
converted into one of the built-in representations. Alternatively, users can
supply their own precomputed representations stored as .npy files. The
resulting data are then split into training, validation, and test sets, after
which the entire training pipeline is orchestrated through a single .yaml
configuration file.
The general workflow is illustrated below.
Representations#
Tip
The representations described below are built into AIdsorb, but
you are not limited to them. You can train models using your own
representations, as long as they are stored as .npy files
(see numpy.save()) in a directory.
Point clouds#
What is a point cloud?
A point cloud is a set of 3D data points, i.e. a set of 3D coordinates and (optionally) associated features. More formally:
\[\mathcal{P} = \{\mathbf{p}_1, \mathbf{p}_2, \dots, \mathbf{p}_N\} \quad \text{and} \quad \mathbf{p}_i \in \mathbb{R}^{3+C}\]where \(N\) is the number of points in the point cloud and \(C\) is the number of (per-point) features.
In AIdsorb, a point cloud is represented as a
ndarrayorTensorof shape(N, 3+C):\[\begin{split}\mathcal{P} = \begin{bmatrix} \mathbf{p}_1 \\ \mathbf{p}_2 \\ \vdots \\ \mathbf{p}_N \end{bmatrix} = \begin{bmatrix} x_1 & y_1 & z_1 & f_{1}^1 & \dots & f_1^C \\ x_2 & y_2 & z_2 & f_{2}^1 & \dots & f_2^C \\ \vdots & \vdots & \vdots & \vdots & \ddots & \vdots \\ x_N & y_N & z_N & f_{N}^1 & \dots & f_N^C \\ \end{bmatrix}\end{split}\]
What is a molecular point cloud?
It is a point cloud where coordinates correspond to atomic positions, and features correspond to atomic numbers and any additional information.
In AIdsorb, a molecular point cloud is represented as
ndarrayorTensorof shape(N, 4+C), whereNis the number of atoms,pcd[:, :3]are the atomic coordinates,pcd[:, 3]are the atomic numbers andpcd[:, 4:]any additional features. IfC == 0, then the only features are the atomic numbers.
Why molecular point clouds?
A fast, generic, and flexible representation that can be applied to a wide range of molecular and material systems. It enables deep learning directly from raw structural information, but typically requires more training data than more specialized representations.
Molecular point cloud example
The above point cloud represents IRMOF-1. You can hover 🖱️ over the figure to play with it.
Energy voxels#
What are energy voxels?
Why energy voxels?
A physics-informed representation tailored for adsorption in porous materials. By explicitly encoding host–guest interaction energies, it often achieves good predictive performance with less training data than more generic representations, at the cost of reduced generality.
Energy voxels example
The above energy image represents IRMOF-1. You can hover 🖱️ over the figure to play with it.
Tutorial#
This tutorial demonstrates a complete workflow using molecular point clouds.
Tip
The overall workflow is essentially the same for all built-in and custom representations. Only the representation-specific preprocessing and model configuration need to be adapted.
Before starting, the following components are needed:
A directory containing files of molecular structures.
A
.csvfile containing the labels of the molecular structures.A
.yamlconfiguration file for orchestrating the DL part.
Note
You are solely responsible for these 3 components.
Data preparation#
Create and store the point clouds
Assuming your molecular structures are stored under a directory named
structures:
$ aidsorb create points path/to/structures path/to/pcd_data --features='[en_pauling]'
$ aidsorb create --config=config.yaml  # Recommended for reproducibility
dirname: 'path/to/structures'
outname: 'path/to/pcd_data'
features: ['en_pauling']
from aidsorb.utils import pcd_from_dir

# Add electronegativity as additional feature.
pcd_from_dir(
    dirname='path/to/structures',
    outname='path/to/pcd_data',
    features=['en_pauling'],
)
Split point clouds into train, validation and test sets
$ aidsorb prepare path/to/pcd_data --split_ratio='[0.7, 0.1, 0.2]' --seed=42
$ aidsorb prepare --config=config.yaml  # Recommended for reproducibility
source: 'path/to/pcd_data'
split_ratio: [0.7, 0.1, 0.2]
seed: 42
from aidsorb.data import prepare_data

# Split the data into (train, val, test).
prepare_data(
    source='path/to/pcd_data',
    split_ratio=(0.7, 0.1, 0.2),
    seed=1,
)
After creating and splitting the point clouds:
project_root
├── pcd_data
│   ├── foo.npy
│   ├── ...
│   └── bar.npy
├── test.json
├── train.json
└── validation.json
Each
.npyfile underpcd_datacorresponds to a point cloud.The
.jsonfiles store the point cloud names for training, validation and testing.
Note
The names stored in the .json files must match the entries in the
index_col column of labels.csv, without the .npy suffix
(e.g. foo.npy → foo).
Tip
You can visualize an input representation with:
$ aidsorb visualize path/to/input.npy
Train and test#
All you need is a .yaml configuration file and some keystrokes:
$ aidsorb-lit fit --config=config.yaml
$ aidsorb-lit test --config=config.yaml --ckpt_path=path/to/ckpt
You can generate and start customizing a configuration file as following:
$ aidsorb-lit fit --print_config > config.yaml
Below is a dummy configuration file for multi-output regression using PointNet:
Warning
The following configuration file is for illustration purposes only. Adjust it as needed!
seed_everything: 42  # Workers are seeded as well

# (Optional) Here you setup the Trainer
trainer:
  max_epochs: 2
  accelerator: 'gpu'

# Here you setup the DataModule (DataModule)
# For more information 👉 aidsorb.datamodules
data:
  # The paths must be relative to where aidsorb-lit is called
  # Consider using absolute paths
  path_to_X: 'path/to/pcd_data'
  path_to_Y: 'path/to/labels.csv'
  index_col: 'id'
  labels: ['y1', 'y3']
  train_transform_x:
    class_path: torchvision.transforms.v2.Compose
    init_args:
      transforms:
      - class_path: aidsorb.transforms.Center
      # Data augmentation
      - class_path: aidsorb.transforms.RandomJitter
        init_args:
          std: 0.3
      - class_path: aidsorb.transforms.RandomRotation
  eval_transform_x:
    class_path: aidsorb.transforms.Center
  train_size: Null  # Use all training data
  train_batch_size: 2
  eval_batch_size: 2
  shuffle: True
  config_dataloaders:
    collate_fn:
      class_path: aidsorb.data.PCDCollator
      init_args:
        channels_first: True

# Here you setup the LightningModule (LitModule)
# For more information 👉 aidsorb.litmodules
model:
  criterion:
    class_path: torch.nn.MSELoss
  metric:
    class_path: torchmetrics.MetricCollection
    init_args:
      metrics:
        r2: {class_path: torchmetrics.R2Score}
        mae: {class_path: torchmetrics.MeanAbsoluteError}
  model:
    # You can also pass a custom architecture
    class_path: aidsorb.modules.PointNet
    init_args:
      head:
        class_path: aidsorb.modules.PointNetClsHead
        init_args:
          n_outputs: 2
          dropout_rate: 0.1

# (Optional) Here you setup the optimizer
# If not specified, Adam will be used with default hyperparameters
optimizer:
  class_path: torch.optim.SGD
  init_args:
    lr: 0.001
    momentum: 0.0

# (Optional) Here you setup the learning rate scheduler
# If not specified, no scheduler will be applied
lr_scheduler:
  class_path: torch.optim.lr_scheduler.StepLR
  init_args:
    step_size: 10
    gamma: 0.1
id,y1,y2,y3
foo,1.0,2.1,3.2
...
bar,9.6,2.7,3.3
See also
The documentation for the LightningCLI, in case you are not familiar with PyTorch Lightning and YAML.
Summing up#
$ aidsorb create points path/to/structures path/to/pcd_data  # Create point clouds
$ aidsorb prepare path/to/pcd_data  # Split point clouds
$ aidsorb-lit fit --config=path/to/config.yaml  # Train
$ aidsorb-lit test --config=path/to/config.yaml --ckpt_path=path/to/ckpt  # Test
Using the Python API#
Although you are encouraged to use the 💻 CLI, for more flexibility you can also use AIdsorb with plain PyTorch or PyTorch Lightning.
import torch
from torch.utils.data import DataLoader

from aidsorb.data import Dataset, get_names

# Create the datasets.
train_set = Dataset(
    names=get_names('path/to/project_root/train.json'),
    path_to_X='path/to/input_data/',
    path_to_Y='path/to/labels.csv',
    ...
    )
val_set = Dataset(
    names=get_names('path/to/project_root/validation.json'),
    path_to_X='path/to/input_data/',
    path_to_Y='path/to/labels.csv',
    ...
    )

# Create the dataloaders.
train_loader = DataLoader(train_set, ...)
val_loader = DataLoader(val_set, ...)

# Create the model.
model = SomeModule(...)

# Your code goes here.
...
import torch
from lightning.pytorch import Trainer, seed_everything

from aidsorb.datamodules import DataModule
from aidsorb.litmodules import LitModule

# For reproducibility.
seed_everything(42)

# Create the datamodule.
dm = DataModule(
    path_to_X='path/to/input_data',
    path_to_Y='path/to/labels.csv',
    ...,
    )

# Create the litmodel.
litmodel = LitModule(
    model=SomeModule(...),
    criterion=torch.nn.MSELoss(...),
    ...
    )

# Create the trainer.
trainer = Trainer(
    max_epochs=10,
    accelerator='gpu',
    ...)

# Train the model.
trainer.fit(litmodel, datamodule=dm)

# Test the model.
trainer.test(litmodel, datamodule=dm)
Questions#
We warmly encourage you to share any questions or ideas in the Discussions. Before asking how to do X?, please read the documentation carefully.